
Your first finished ticket
In this tutorial you install rev0, answer its setup wizard, give an agent a small job in a scratch repo, approve its plan, merge what it wrote, and open the Knowledge Base. It takes about 15 minutes, and follows the same five steps, in the same words, as the Getting started coach on the board.
What you will have
Section titled “What you will have”- A board running on your machine, set up with the Developer profile.
- A scratch git repo,
hello-rev0, with a README an agent wrote on its own branch. - That branch merged, after you annotated and accepted the plan and reviewed the diff.
You need macOS or Linux, and a Claude subscription (or a ChatGPT subscription for Codex). The installer sets up everything else, and you sign the agent in from the board.
1. Install and start the board
Section titled “1. Install and start the board”Pick one:
-
The one-line installer installs everything rev0 needs, then starts the board:
Terminal window curl -fsSL https://raw.githubusercontent.com/cpc-studio/rev0/main/install.sh | bashIt generates an access token and saves it as
REV0_AUTH_TOKENin~/rev0/.env; the board copies it into~/.rev0/.envwhen it first starts. Open http://127.0.0.1:8000. The board asks for the token the first time: paste the value from that file where it says Paste your REV0_AUTH_TOKEN and click Sign in. Leave the terminal running. -
The Mac app on Apple Silicon: install
rev0-macos.dmgas shown in Install rev0 and open rev0 from Applications. It opens the board in its own window, already signed in. -
The Linux app on x86_64: install
rev0-linux-amd64.debor run the AppImage as shown in Install rev0. Like the Mac app, use its window. -
A single binary on Apple Silicon macOS or x86_64 Linux: download it and start it as shown in Install rev0, ending with
./rev0-darwin-arm64 serve --with-runner, then open http://127.0.0.1:8000. With no token set, the board opens straight away on this machine.
Either way, the board opens on the setup wizard, Welcome to rev0.
2. Answer the setup wizard
Section titled “2. Answer the setup wizard”The wizard has five screens for the Developer profile. Everything it sets stays editable in Settings.
-
You: type Your name (agents call you by it) and, if you like, the Email agents sign their work with. Under Name your first board, type a name for the board. Click Continue.
-
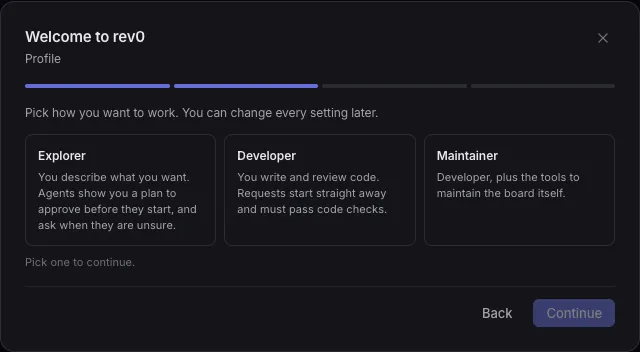
Profile: click Developer. It runs tickets straight away, lets agents fan out on broad work, and turns on the code quality rules and the pre-merge gate. Click Continue.
-
AI engines: on the Claude row, click Install if it is offered, then Sign in, then Open the Claude authorize page, and approve. The row finishes by itself and reads Ready. (Using Codex? Do the same on the Codex row.) If the installer already signed you in, the row says Ready straight away. Click Continue.
-
Review agent: leave it on Off. Click Continue.
-
How it works: read the four steps. Click Finish.
The board opens, with a small tip pinned next to the Settings button: Getting started 1/5: Point the board at your code. That is the Getting started coach. It rings one control at a time, and ticks a step off by itself once the board sees you did it. The rest of this tutorial follows it.
To learn what the other profiles change, read Choose a profile, and change it later.
3. Point the board at your code
Section titled “3. Point the board at your code”Agents need a git repository to work in. In a terminal, make an empty one:
mkdir hello-rev0 && cd hello-rev0 && git init && git commit --allow-empty -m "start"pwdThe empty commit gives the agent’s branch something to start from. Copy the path pwd printed.
Now make it the board’s default:
- In the coach’s tip, click Open Settings. Settings opens on Workspace.
- Under Board, paste the path into Default working directory.
- Click Save changes, then close Settings.
Result: the coach moves on to Create your first ticket and rings the Create button.
Every new ticket now starts in hello-rev0.
4. Create your first ticket
Section titled “4. Create your first ticket”-
In the coach’s tip, click New ticket (or click Create, a + on narrower screens).
-
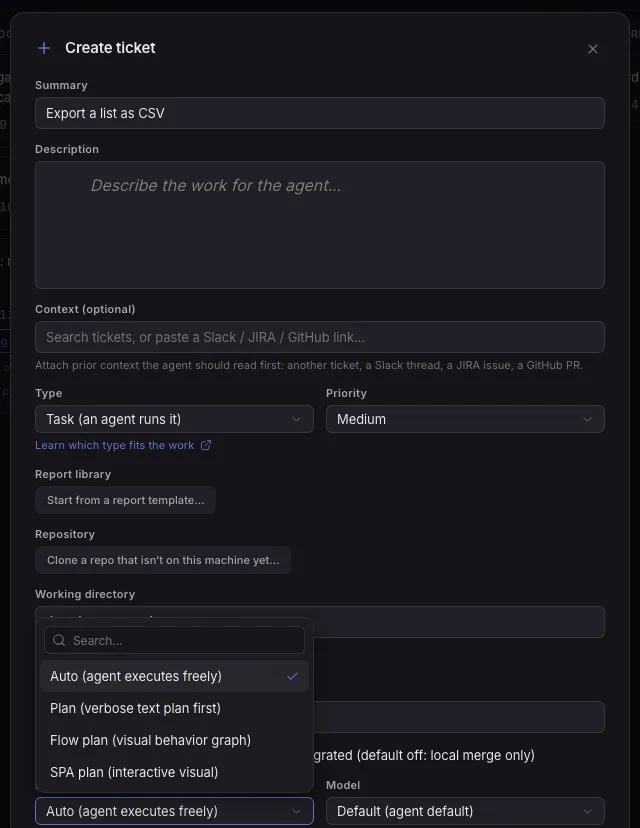
In the Create ticket form:
- Summary:
Add a README that says what this repo is - Description:
One short paragraph: this is a scratch repo for trying rev0. - Working directory: already filled in with your
hello-rev0path. - Mode: it starts on Auto (agent executes freely), the Developer default. Pick Plan (verbose text plan first), so the agent has to show you its plan before it touches anything.
- Column: leave it on To Do (queued for the agent).
- Summary:
-
Click Create.
Result: the card appears in To Do, and within a few seconds the runner claims it and moves it to In Progress. Click the card to open it:
- Git integration shows the agent’s own branch,
agent/ticket-<id>, in a worktree next to your repo (hello-rev0.agent_worktrees/). Yourhello-rev0checkout is untouched. - Activity fills with the agent’s work as it happens: it reads the repo and drafts a plan. In a plan mode it cannot edit files yet.
5. Approve a plan
Section titled “5. Approve a plan”When the plan is ready, the card moves to Pending Action, the column that means “needs you”, and the coach rings it: Approve a plan.
-
Open the ticket. Its Plan reads awaiting sign-off.
-
Select a few words of the plan. In the toolbar that appears, click Comment, and write
Mention that it was written by an agent.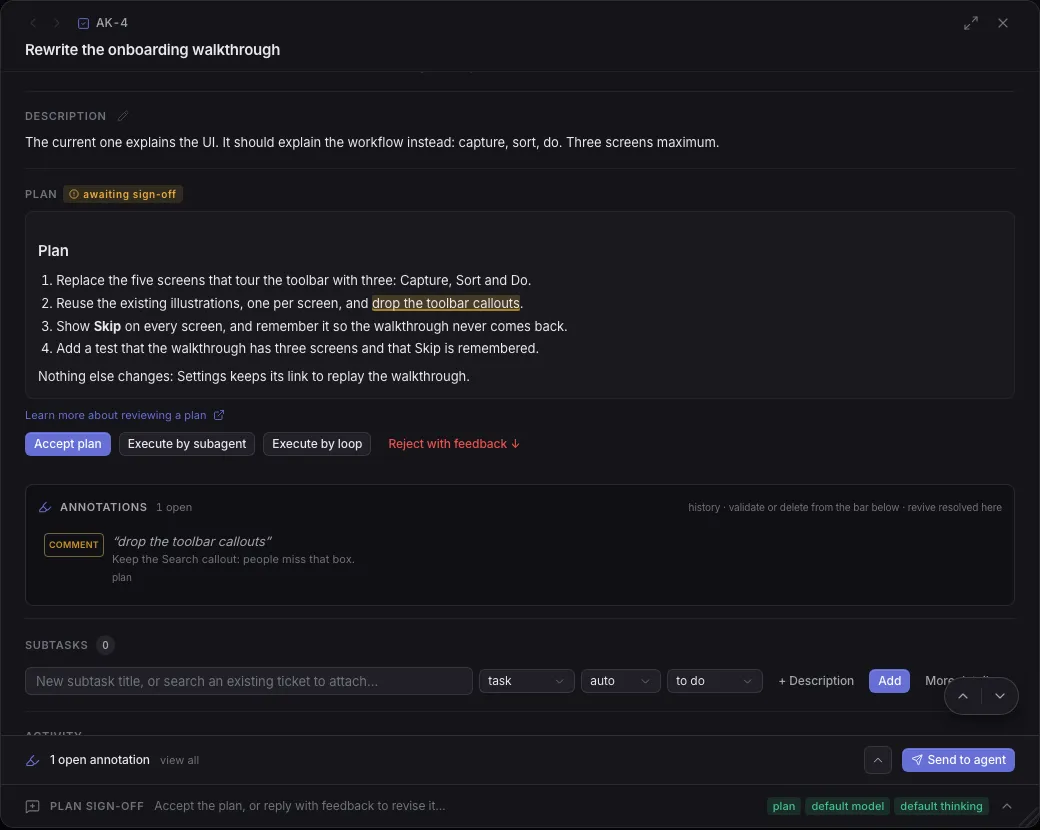
-
Click Send to agent in the bar under the plan.
Result: the agent revises the plan with your note, and the ticket comes back to Pending Action for you. Read the new plan, then:
- Click Accept plan.
Result: the ticket switches to Auto and goes back to To Do; the agent claims it again, writes the README and commits it on its branch. The coach moves on to Merge a ticket.
Next to Accept plan are Execute by subagent, Execute by loop (for splitting a big plan into several agents) and Reject with feedback, which sends the plan back with a message instead of accepting it. Review and annotate a plan covers them.
6. Merge a ticket
Section titled “6. Merge a ticket”Before the ticket settles in In Review, the board runs its verification checks in the worktree. With the Developer profile these include the Code quality gate, which checks the coverage, complexity and lint of what the change touched. A README passes it quickly.
When the card reaches In Review, the coach rings that column. Open the ticket:
- Branch diff & review shows exactly what the agent changed: a new
README.md. - Commits lists the commit it made on its branch.
- Verification checks, in the plan, show the gate as passed.
- A Ready to merge banner sits at the top.

- In the banner, click Merge.
- In Merge branch, click Merge.
If a check is still running, the board asks first: Wait for verification is the safe answer.
Result: the branch lands in your repo’s base branch, and the ticket stays in In Review so you can try the change first. Back in the terminal:
git log --onelinecat README.mdThe agent’s commit is in your history, and the README is in your working tree. When you are happy, drag the ticket to Done.
7. Open the Knowledge Base
Section titled “7. Open the Knowledge Base”The coach’s last step rings the Knowledge tab in the header: Open the Knowledge Base.
- In the coach’s tip, click Open it (or click Knowledge).
Result: the Knowledge Base opens. This is where agents file the conventions and gotchas they learn, so the next run does not rediscover them. A page an agent proposes waits for your review before it goes live. Keep what agents learn shows how to use it.
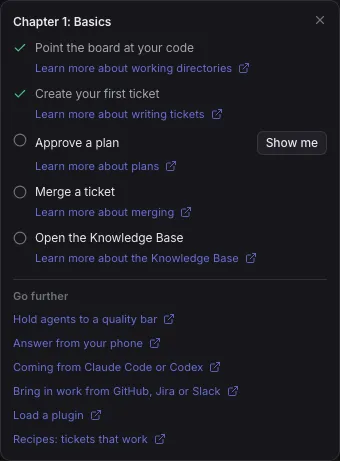
That completes the coach’s first chapter. Click the Getting started pill at the bottom right of the board to open its checklist: each step with a link to its guide, Up next with a Start button for chapter 2 (steering a running agent), and Go further. If you clicked Later earlier, the same checklist shows where you are, with Show me on the current step.
You can
Section titled “You can”- Install rev0 and answer its setup wizard.
- Sign an agent CLI in from the board.
- Point the board at a repository with a default working directory.
- Create a ticket in a plan mode, so the agent waits for your sign off.
- Annotate a plan, send it back, and accept it.
- Read an agent’s diff and commits, and merge its branch.
- Find the Knowledge Base, where agents keep what they learn.
- Run three agents at once runs several tickets side by side on one repo.
- Write a ticket an agent can finish turns the next idea into a ticket that needs no follow up.
- How rev0 works follows a ticket through the same steps, including the parts this tutorial skipped.