
Choose a profile, and change it later
A profile is the starting set of defaults the setup wizard writes when you finish it: how new tickets run, whether agents may fan out, and whether code must pass the quality rules. Pick one the first time you open the board, and switch later from Settings whenever your use changes.
Before you begin
Section titled “Before you begin”A profile is only a batch of ordinary settings, written once. Every value it sets stays editable in Settings afterwards, one by one, without running the wizard again.
Pick a profile in the setup wizard
Section titled “Pick a profile in the setup wizard”The wizard, Welcome to rev0, opens by itself the first time you open a new board.
-
On You, fill in Your name and, if you like, Email (agents sign their work with it). Under Name your first board, type what the board should be called; Details holds its Ticket acronym and Colour. Click Continue.
-
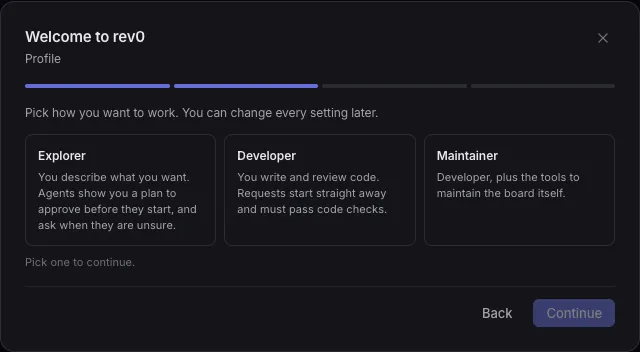
On Profile, click one of the three cards: Explorer, Developer or Maintainer. Nothing is selected for you, and Continue stays off until you pick one.
-
On AI engines, click Install beside each engine you want (Claude, Codex, Cursor), then Sign in on the same row until it reads Ready. With Developer or Maintainer, a GitHub row has Connect: it shows a short code and the page to type it on. Under Agent Browser Extensions, click a password manager to add it to the browser agents use. Everything on this screen can wait: the same controls are in Settings.
-
With Developer or Maintainer only, on Review agent, pick Off, On request or Automatic. A review agent is one more run per ticket, so it starts Off. Explorer has no such screen and gets no review agent.
-
On How it works, read the four steps, then click Finish.
Result: the board takes the name you gave it, the profile’s settings are saved, and the Getting started coach starts on the board.
Explorer sees four screens, Developer and Maintainer five. Back returns to the previous one. Closing the wizard with its close button only puts it off: it opens again the next time you load the board, until you finish it.
What each profile sets
Section titled “What each profile sets”| Profile | Who it is for | What it sets |
|---|---|---|
| Explorer | You steer, you do not code every day. | Default mode for new tickets (Settings > Workspace > New ticket defaults) is Interactive plan, so every ticket waits for a visual plan you sign off. Agent orchestration is off (one agent per ticket). Enforce code quality and the Pre-merge gate (Settings > Agents) are off. |
| Developer | You write and review code. | Default mode for new tickets is Auto, so new tickets run straight away. Agent orchestration is on, so a broad ticket can fan out into subtickets. Enforce code quality is on with the warn mode, and the Pre-merge gate is on, so a branch cannot reach In Review while the rules are red. |
| Maintainer | Whoever maintains the board itself. | Everything Developer sets, plus Debug tools (Settings > Automation > Debug), which adds Emergency stop and Restart server under Settings > Advanced > Debug. |
All three also set:
- Max concurrent agents to 8 (Settings > Workspace > Board).
- Default plan type to Interactive plan (Settings > Agents > Model & thinking).
- Automatic review lane to your answer on the Review agent screen, Off unless you chose otherwise and always Off for Explorer (Settings > Automation > Automatic review lane).
- Claude/Codex usage meters on, so the header shows how much of your plan you have used.
The full table, setting by setting, is in Settings.
Change a profile later
Section titled “Change a profile later”To change one setting, open Settings and change it: the profile does not come back to undo it.
Run setup again
Section titled “Run setup again”To switch to another profile as a whole:
- Open Settings > Advanced > Setup.
- Click Run setup again. Settings closes and the wizard opens.
- Pick the profile and answer the steps, then click Finish.
Result: the new profile’s settings are written over the current values of the same settings, and the Getting started coach starts again. Closing the wizard instead changes nothing.
Use the Getting started coach
Section titled “Use the Getting started coach”After the wizard, the coach walks you through the real board. It rings one control at a time and pins a tip next to it. It never covers or blocks anything, and a step ticks itself off when the board sees you did it.
Chapter 1 has five steps for Developer and Maintainer:
- Point the board at your code: rings Settings. Open Settings takes you there. Done when a default working directory or a repos root is set. See Point the board at your code.
- Create your first ticket: rings Create. New ticket opens the form. Done when any ticket exists.
- Approve a plan: rings the Pending Action column. Done when any plan was accepted.
- Merge a ticket: rings the In Review column. Done when any branch was merged.
- Open the Knowledge Base: rings the Knowledge tab. Open it switches to it. Done once you opened it in this browser.
With Explorer, chapter 1 has four steps and starts at Create your first ticket: an Explorer’s tickets run in their own scratch space unless you pick a folder on a ticket, so the coach never asks for one.
Your first finished ticket walks all five with a scratch repo.
Each tip also links to the guide for its step. Chapters 2 and 3 start only when you ask for them (see Start the next chapter):
- Chapter 2: Steer an agent: Follow an agent live (done once you open a ticket while an agent is working on it, in this browser), Reply while it works (done once you send a message to a running agent) and Answer a tool request (done once any tool request is allowed or declined).
- Chapter 3: Scale up: Split big work into subtickets (done once any ticket has a parent that is not a Loop), Hand repeat work to a Loop (New Loop opens the Create form on the Loop type; done once a Loop exists) and Run a Goal until it is done (New Goal; done once a Goal exists).
Put the coach away for now
Section titled “Put the coach away for now”- In the tip, click Later.
Result: the coach folds into a Getting started pill at the bottom right that counts the steps done, such as Getting started 2/5. Reloading the board opens the tip again.
Open the checklist
Section titled “Open the checklist”- Click the Getting started pill.
Result: the checklist opens: the chapter’s steps, ticked when done, each with a link to its guide, then Up next and Go further (guides for what to learn after the basics). Click Show me on the current step to get its tip back.
Start the next chapter
Section titled “Start the next chapter”When every step of a chapter is done or skipped, the pill reads Getting started: up next.
- Click the pill.
- Under Up next, click Start.
Result: the coach rings the first step of the next chapter.
Skip a step
Section titled “Skip a step”- In the tip, click Skip this.
Result: the coach moves on to the next step, and remembers the skip.
Stop the coach
Section titled “Stop the coach”- In the tip, click the X (Stop the tour).
Result: the coach is gone on this board. To bring it back, open More actions in the header and click Getting started under Help: the checklist opens where you left off. Running setup again restarts it too, and steps you already did stay done.
Let the board show you a task
Section titled “Let the board show you a task”Many guides on this site can point at the controls they talk about, one step at a time, on your own board.
- In the header, open More actions.
- Under Help, click Show me how, then pick a task.
Result: the board rings the control for the first step and pins its tip beside it. Click Next and Back to move through the steps, and Done or the X to stop. A step may open Settings or an empty Create form to reach its control; it never clicks, saves or approves anything for you. Docs for this screen, in the same menu, opens the guide for the app you are looking at.
Choose how long help links stay
Section titled “Choose how long help links stay”Panels, forms and Settings sections carry a link to the guide for what you are looking at, such as Learn more about tool requests under a tool request. By default each one shows on your first three visits to the board, and retires once you click it. The Getting started checklist keeps its links. To change that:
- Open Settings > Workspace > Appearance.
- Under Help links, pick Always, A few times, The first time only or Never.
Result: the choice applies on this device right away, and every link starts afresh under it. With Always, a link stays even after you click it.
If something goes wrong
Section titled “If something goes wrong”The wizard does not open on a board I upgraded
Section titled “The wizard does not open on a board I upgraded”That is on purpose. A board that already had tickets when it was upgraded is marked as set up, and its coach as stopped, so neither appears. Open Settings > Advanced > Setup and click Run setup again to see them.
Could not save the setup
Section titled “Could not save the setup”The board could not write the profile, so the wizard stays open with your answers. Check that the board is still running (the page reloads), then click Finish again.
Related
Section titled “Related”- Point the board at your code, to finish the coach’s first step.
- Settings, for every setting a profile writes and its default.
- Hold agents to a quality bar, to tune the rules the Developer profile turns on.
- Review and merge an agent’s work, for the review agent the wizard asks Developer and Maintainer about.